Edval and Arbor Timetable Sync Instructions
Introduction
This document will guide you in syncing your Edval timetable file to Arbor. Please ensure that you have a completed timetable file prior to syncing. The process may take a few hours from start to finish if you have just moved over to Arbor. Please follow the instructions carefully and complete all steps.
Important note: If you run a two-week timetable, this needs to be set up in Arbor prior to any sync. Change this in Timetable Administration for the upcoming year. This change can only be made between 14:00 and 17:00 in Arbor, so make sure this is done before you plan to sync.
Registration periods
The advice from Arbor is that it’s very quick and easy to set up registration classes in Arbor and therefore this does not need to be done in Edval. Please therefore delete any registration classes you see in the excel file (leave the year level and class code columns blank).
Configuring the sync
Go to File > Synchronise > Configure.
•Click Sync If you don’t see the Arbor sync click the plus sign and select it from the dropdown list.
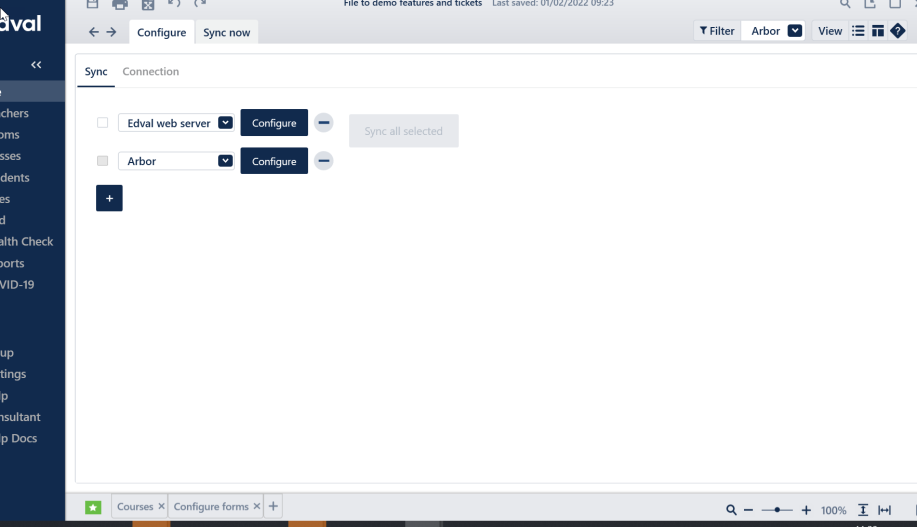
•Click configure next to Arbor.
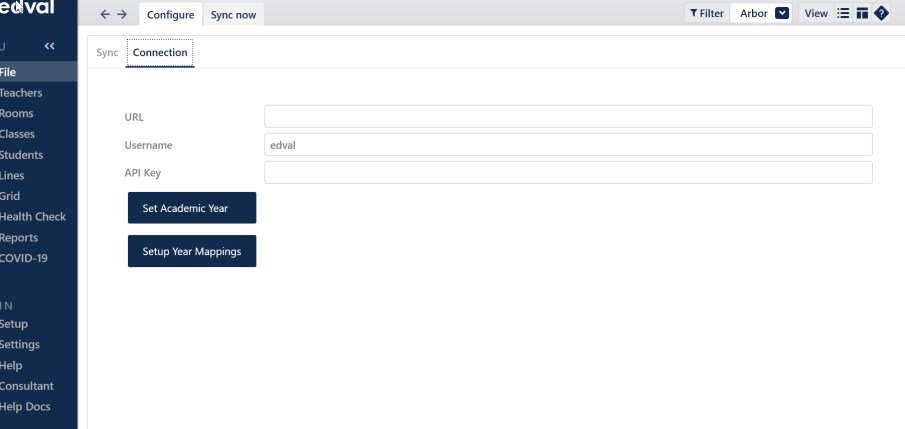
The username is “edval”.
We can provide you with your individual URL and API key. Please email support@edval.education to request this. The URL and API key are required to proceed with the steps outlined in this document. Click to set the Academic Year eg. 2024/25. Click to set up Year Mappings. Note that non-curriculum years such as Meetings and PPA do not need to be mapped, as well as any derived years.
Matching Edval data with Arbor
•Click Sync now
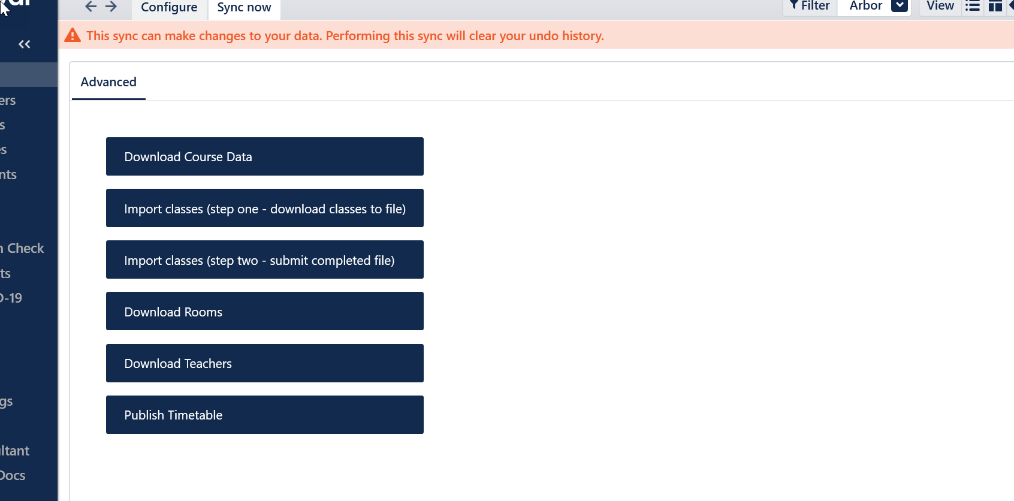
•Click Download Course data.
Please double check that your Edval teacher codes and room codes match those already in Arbor. Once you are confident of this:
•Click Download Rooms.
•Click Download Teachers.
Teacher/Room Admin IDs
Clicking Download Teachers and Download Rooms will fill in the ID numbers associated with these in Arbor, providing they have the same code. If a teacher has AE as a code in Edval and a code of ADE in Arbor, then they will be created as a new teacher when downloading. Go to Teacher Data (or Room Data) and make sure that everyone has an ID in the Admin ID column. If you cannot see this column click the View menu in the top right and enable Admin ID.
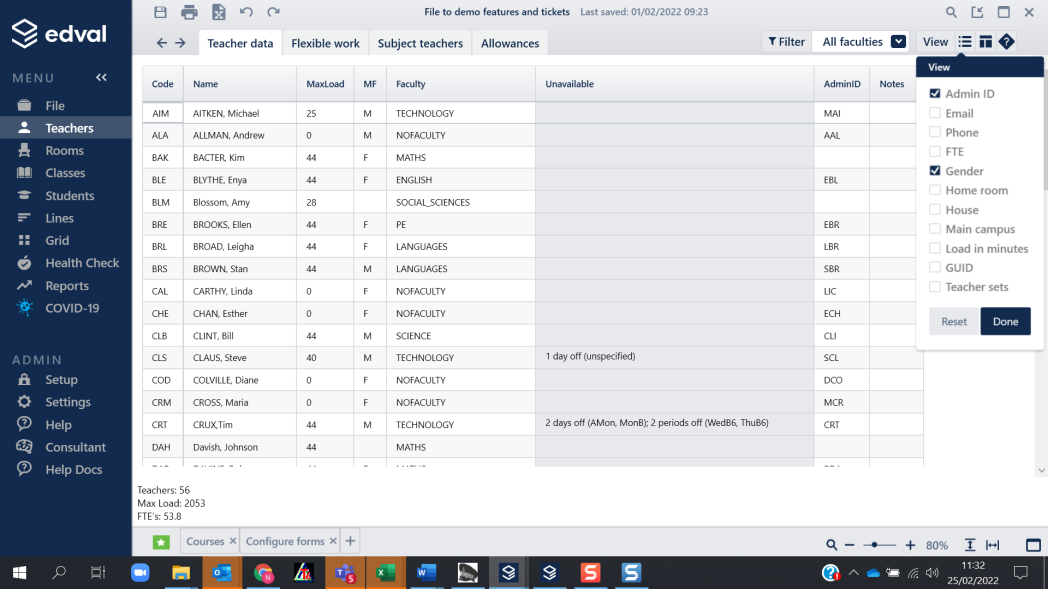
Delete and amend any duplicates you may have, and for anyone without an ID, you can manually input these. To find them in Arbor for teachers, go to their staff page and it is listed in their details as a staff ID. For rooms, go to Rooms and Sites, click on the room, and the ID number appears in the URL.
•Click Import Classes – Step 1
An excel file will be saved on your computer in the same location as your .etz file, in a folder named Exports. It should open automatically, otherwise open this excel file and populate the year column and class code column. If your class codes in Edval are identical to the course codes in Arbor, then you can copy column F (Academic Unit Name) into column A. If you have an courses that exist in Arbor that do not exist in Edval, then these rows can be deleted. Make sure to highlight the whole row and delete the whole row, not just remove the data from it.
The Edval Year column may be mostly or fully populated. The input for this is the year name as they exist in Edval (eg. 7 or 10). If you have classes that appear in derived years then this needs to be inputted as well with the exact name of the year.
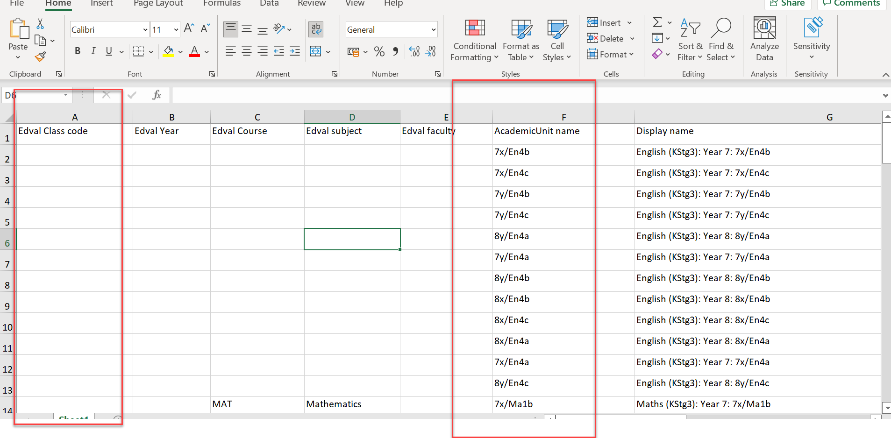
Note: - Meetings and other non-class entries should be deleted from the spreadsheet as these do not need to be imported into Edval. When you create your meetings in Edval these will be synced to Arbor as new entities and do not need to match up with anything pre-existing - The advice from Arbor is that it’s very quick and easy to set up registration classes in Arbor and therefore this does not need to be done in Edval. Please therefore delete any registration classes you see in the excel file.
Note: - It is important to know that any class labels from NOVA may be the Academic Unit Name in Arbor, but the code in Edval will be the Systematic Code from NOVA. You can change these in Edval or Arbor to both be the same before starting the matching, or manually fill in the correct Edval Class Codes in the matching sheet. It is very important to check that you know which class is which in Edval Class Data if you had bespoke Class Labels in Nova.
Note: - Any classes that do not have an identical name need to be edited in column A with the exact code as it appears in Edval. If you include course names that do not have a perfect match in Edval, then they will be created as new, empty classes in Class Data. These will need to be deleted if created and this process ran again.
Save and close the excel file and return to Edval.
•Click Import Classes – Step 2
You will be prompted to locate your excel file and click open.
Once imported please check Classes > Class data- in your Edval .etz to ensure that only the necessary classes are appearing with no duplicates. If there are classes that are not matching in Arbor and Edval, you will see some extra classes have appeared at the bottom of your class data screen (check each year group). You will need to investigate what is not matching between the two systems and delete these extra classes, then re-run both Import Classes steps.
•Now click on the Pre-publish Report
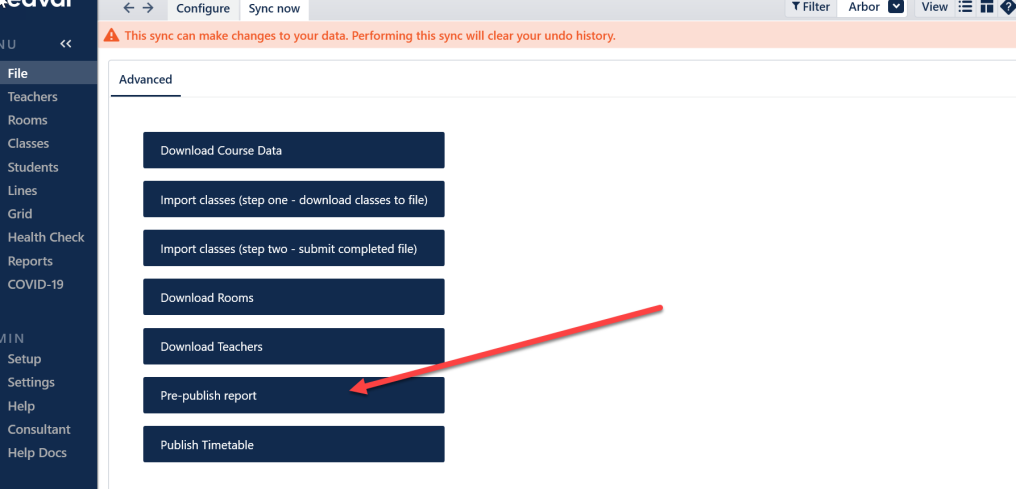
Set the effective start date for the timetable data you are using. Once it has run the report it will give you a spreadsheet that will show anything that is not matching correctly between Arbor and Edval.
It could be academic units are missing, teacher IDs, teacher code not matching etc. If you filter by the final column, it will show you what rows have a problem:
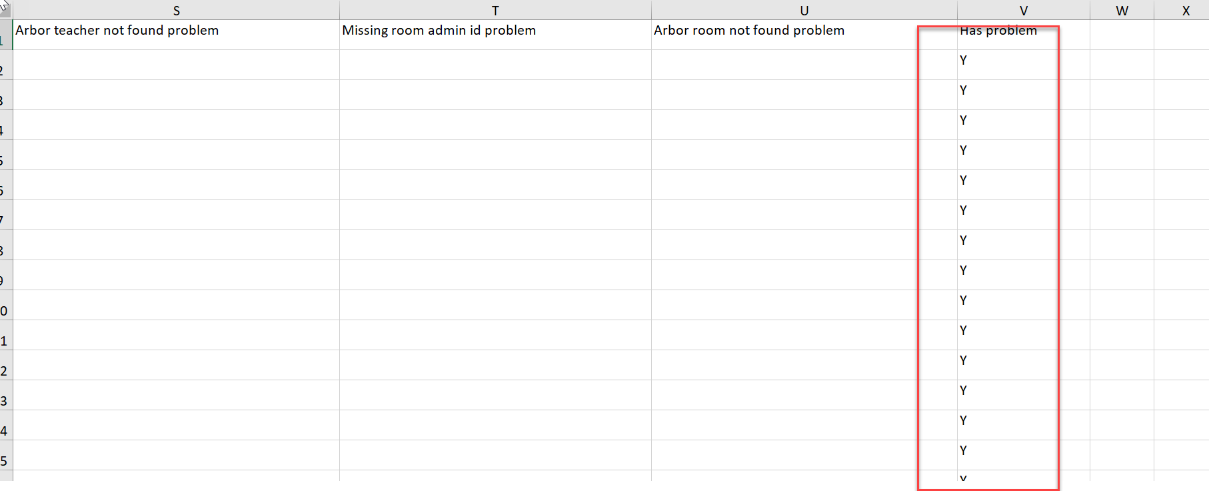
You will not be able to pass this point until everything is matched. You can edit Rooms and teachers that needed editing in the .etz file and re-run the Pre-publish Report without having to redo any other steps, but Classes missing a match will require redoing Import Classes steps 1 and 2.
Syncing the Timetable
Once your timetable is complete in Edval and there are no errors in the pre-publish report go to File > Synchronise > Sync now > Publish Timetable. Select the effective start date for the data again. This will send all the data to Arbor, and will appear as a new Import under School > Timetable > Timetable API Integration > Timetable Imports. Click on the Import ID and you will see something like the below.
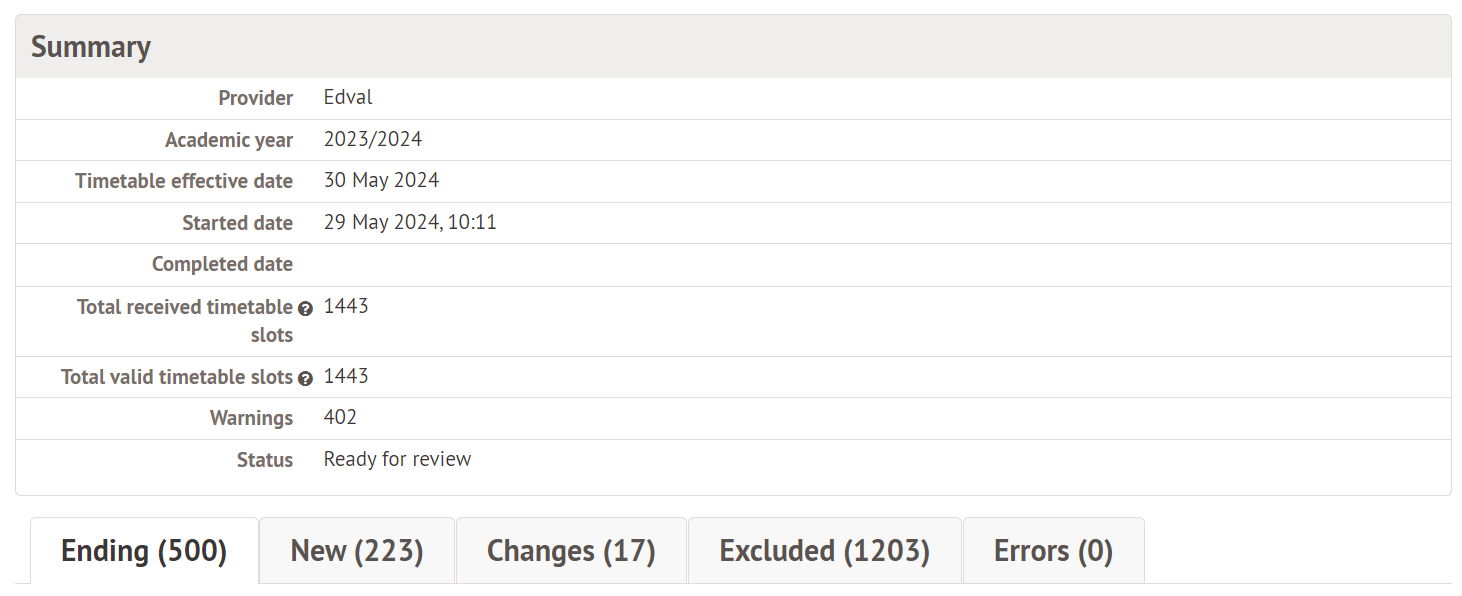
When syncing a brand new timetable for the first time in the year, you will see nothing but New slots. You need to click into the new tab, tick all slots and Bulk Action – Schedule Slots.
If you are syncing a replacement timetable, then Arbor will automatically recognise which slots need to end and are being replaced, and what slots are changing. Click into each tab consecutively and select and bulk action the slots.
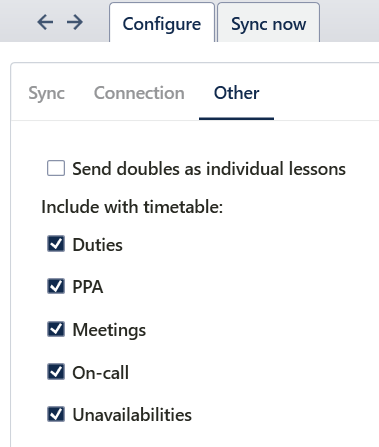
Any Non-Class Codes (Repeating School Events in Arbor) such as meetings and duties do not appear in this Timetable Import. They appear in School > Timetable > Timetable Administration > Timetable Slots. On the initial sync of a timetable, these will need to be Bulk Actioned and Scheduled from within the Provisional Slots. Any subsequent syncs will require any NCCs/Events that are to be changed or replaced be Bulk Actioned and Ended in the Scheduled tab before the sync takes place. It is also possible to not send these slots from Edval if they do not need to be replaced. Go to File > Synchronise > Configure > Other and you can select which NCCs you do or do not want to send with the sync.
Where you have classes that are ending completely (for rotating classes or when exam years leave early in the summer) then you need to end these slots in the same way you would any School Events. Go to School > Timetable > Timetable Administration > Timetable Slots and end them out of the Scheduled slots.
Was this article helpful?
That’s Great!
Thank you for your feedback
Sorry! We couldn't be helpful
Thank you for your feedback
Feedback sent
We appreciate your effort and will try to fix the article