TABLE OF CONTENTS
- Preamble
- A. Export a Master Timetable to Excel
- B. Generate a list of teachers available/free in each period
- C. Cover Classes using the Excel spreadsheet
- D. Tally of Covers
Preamble
This document outlines the process to assist Daily Organisers in manually managing covers using exports from the current .etz timetable file.
If you are not the current Timetabler or do not have access to the .etz file, please contact your Timetabler for assistance in obtaining the required exports.
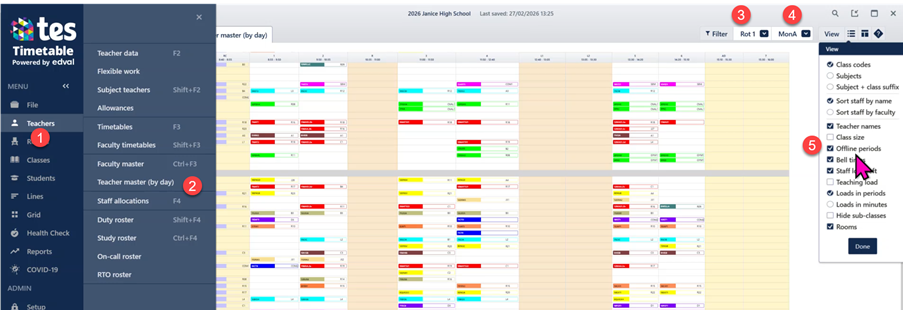
A. Export a Master Timetable to Excel
- Go to Teachers > Teacher Master (by day)
- Select the current rotation in the filter, eg Rot1.
- Select the first day in your cycle, eg MonA.
- In the View menu, tick Offline periods so yard duties are included.
- In the Layout menu, select 1 section.
- Click the Export to Excel icon at the top left.
- Repeat this process for each day in the cycle.
- Consolidate all exports into one Excel file by creating a separate tab for each day.

 All exports are saved in the Exports subfolder located alongside your etz file. The consolidated TeacherMasterByDay workbook is the Excel file you will use as master data source when managing covers.
  Please note that this file contains the current ETZ timetable only. Any changes previously made in Daily will not appear in this export.
 B. Generate a list of teachers available/free in each period
- Go to Reports > Teacher availability.
- Select current rotation in the filter.
- Export the report to Excel.
- Add this export as another tab in your Excel file in step A.

C. Cover Classes using the Excel spreadsheet
- Create a copy of the master timetable Excel sheet for the specific day requiring covers.
- Rename it to include the day and date.
- Add filters to the header row.
- Insert a new Cover column for each period to record the teacher who will cover that lesson. Name column headers based on your grid structure (eg, MonA1).
- Apply Conditional Formatting → Highlight Duplicate Values to each Cover column. This helps prevent assigning the same teacher to more than one class in the same period.
- In the Teacher column filter, click Select All to uncheck all names.
- For each absent teacher, tick their name from the dropdown so that only teachers who are away and their respective classes will be displayed. This will mimic your Daily Covers page. You can highlight the absent teacher’s name (eg, yellow fill) for visibility.
- Refer to the Teacher Free spreadsheet from Step B to determine who is available for each period.
- In the Cover column created in Step C4, enter the replacement teacher’s code for that lesson.
Example of how the Excel spreadsheet might look like.


Example of how to add data validation to automatically display, in a dropdown list, all teachers who are free during MonA period 1.

- Highlight the cells where you want to apply the data validation.
- Go to Data > Data Validation.
- Select Data Validation from the menu.
- In the Settings tab, choose List from the Allow dropdown.
- Click in the Source box to define the list of teacher options.
- Navigate to the TeacherFree tab and carefully select only the cells that correspond to the free teachers for the specific period.
- The cell references for the selected list of free teachers will appear in the Source box.
- Click OK to apply the validation.
- Repeat these steps for all Covers columns in your spreadsheet.
D. Tally of Covers
Create another sheet in your Excel file to track and total how many covers each teacher has completed.
Was this article helpful?
That’s Great!
Thank you for your feedback
Sorry! We couldn't be helpful
Thank you for your feedback
Feedback sent
We appreciate your effort and will try to fix the article